Saturday, 30 March 2013
Friday, 29 March 2013
Cloning
I've been waiting for this to be the word of the day, so excited to give it a go.
Here are the steps i took to get the final photo:
1. Set up your tripod & camera capturing the whole area for cloning. Check lighting etc & take a photo of the background. Do not move the camera after this shot is taken.
Here are the steps i took to get the final photo:
1. Set up your tripod & camera capturing the whole area for cloning. Check lighting etc & take a photo of the background. Do not move the camera after this shot is taken.
2. Start with your first pose & take the photo (i used a remote set on a 3 second delay) & follow with the rest of the poses you want.
3. Once all your poses are taken, they are ready for editing.
4. Do not start with colour correcting any photos, leave raw for now.
5. Using the the Rectangular Marquee tool, select around the area of the first pose, copy & then paste in a new layer on the photo of the background. Line up the first pose with the background photo.
6. Repeat step 5 with your next pose. If the 2 poses are overlapping use the eraser (soft brush) to remove excess background.
7. Repeat for the rest of your poses.
8. Once all poses are done flatten layer.
9. Colour correct.
10. I used the "Smart Sharpen" to define the image as well.
Final Image:
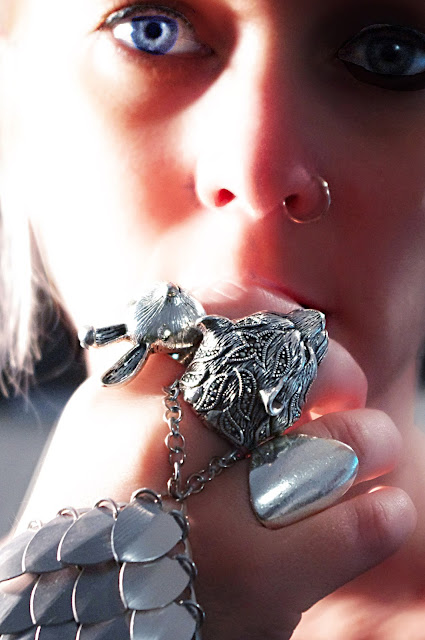
Ring Final Shots
I took inspiration from this photo today, thought it had great composition & was interesting enough rather than just shooting the ring on its own.
This is my very favorite ring of all time.
It's a one-off ring that cost me the price of one of my arms. I'm a Leo
& i'm obsessed with big cats so i figure it suits my personality to a
T.
To achieve the below colouring just add the Vintage Action
The editing process was as follows:
1. Colour correct
2. 30% Bring on Eyes Action
3. 50% Sharpen This Action applied to eyes, nose, mouth & rings & flatten
4.Apply Glamour Glow Skin Technique & flatten
You can watch it here:
5. Select Eyes & copy to new layer
6. Colour Balance, make opacity 50%
7. Smart Sharpen:
Amount - 91
Radius - 9.3
Remove - Gaussian Blur
8. Erase excess colour around eyes & flatten
9. Apply Cooler Action & flatten.
& make opacity 50%.
Thursday, 28 March 2013
Shoes Shoes Shoes
Didn't need any inspirational pics for the word shoes, I did have another idea planned but my hubby
talked me out of it as there was a lot of heavy lifting for him - lol.
These are my sneakers, i wear them everywhere : walking, running, to
work, to dinner - everywhere. & yes, they are fully sequined
runners. I'm a city girl, there's no denying it!
Here is how i got from raw to final.
Raw
Final
1. Basic colour correct
2. Adjust Colour Balance
3. Apply Cooler Action
4. Apply Smart Sharpen:
Amount - 60
Radius - 11.50
Remove - Gaussian Blur
5. Apply Boost Action
6. Apply Fresh & Colourful Action
Raw
Final
1. Basic colour correct
2. Apply Cooler Action
3. Apply Boost Action
4. Apply Define & Sharpen Action
5. Adjust Colour Balance & use Levels to lighten slightly.
Raw
Final
1. Basic colour correct
2. Select darker white areas & pull back till 100% white
3. Apply Cooler Action
4. Apply Define & Sharpen Action
5. Colour fill different shades of white areas with chosen colours.
All actions used can be found here :
http://thepioneerwoman.com/photography/2010/03/actions-update-2/
(yes, they are free!!)
All actions used can be found here :
http://thepioneerwoman.com/photography/2010/03/actions-update-2/
(yes, they are free!!)
Tuesday, 26 March 2013
From Below
Final photos from the challenge From Below:
1. Colour correct
2. Vibrance = -40
3. Smart Sharpen:
Amount - 152
Radius - 9.6
Remove - Gaussian Blur
4. Boost Action
5. Levels - lighten
6. Vintage Action
1. Colour correct
2. Vibrance = -40
3. LAB Mode: Alter Light channel
4. RGB Mode:
Light/contrast - 10 light
5. Smart Sharpen:
Amount - 93
Radius - 34.3
Remove - Gaussian Blur
6. Warmer Action
7. Colorized Action
1. Colour correct
2. LAB Mode: Alter Lightness channel
3. RGB Mode
4. Warmer Action
5. Heart Action
6. PW's B & W Action
1. Colour correct
2. LAB Mode: Alter Lightness channel & A Channel
3. RGB Mode
Subscribe to:
Comments (Atom)


